Wine Cabinet Setup Instructions
Step 1: Leveling Instructions
The first step in setting up your wine cabinet is to make sure that it is level, with all the leveling feet squarely on the floor and with the doors properly sealed against the cabinet. The wine cabinet can be leveled by turning the leveling feet underneath the cabinet. You can extend the feet of the cabinet by turning the feet CLOCKWISE (assuming you are looking down from the top of the cabinet.)
- Begin with corner feet touching the floor and center feet (if any) raised.
- If the cabinet will be resting on plush carpet, place a carpet board under the cabinet so that all the leveling feet will remain on the same plane over time.
- Side to Side - Place a level on the top of the cabinet (not the door) parallel to the door. Raise or lower either side of the cabinet by rotating the feet by hand. On larger cabinets with six leveling feet, use the four corner feet only for leveling purposes. Do not lower the center leveling feet to the floor until the doors are aligned.
- Front to Back - place a level on top of the cabinet (not the door) perpendicular to the door, and follow the same procedure.
- If cabinet is level, the lock should work freely without force. Also, the door(s) should be even (within 1/4 inch) with the top edge of the cabinet. Additionally, there should be no gaps between the rubber gasket on the door, and the face of the cabinet.
Step 2: Door Alignment Instructions
Proper door alignment is vitally important to create and maintain an airtight seal inside the cabinet. In addition, air leaks caused by improper door alignment will compromise the environment inside the cabinet, and may create condensation along the door panels which eventually will lead to warping of the door. Follow the instructions below to properly adjust your door(s).
After leveling the cabinet, the doors must be aligned so that they are even with each other, square with the cabinet and properly sealed against the cabinet. Air leaks caused by improper door alignment will compromise the environment inside the cabinet, and may create condensation which, left untreated, will cause warping of the door. Follow the instructions below to properly align your door(s).
- If your cabinet has only one door, the plane of the top of the door should be parallel to the plane of the cabinet. If the non-hinge (i.e. left) corner of the door is higher than the cabinet, go to the BACK RIGHT CORNER of the cabinet and turn the leveling foot once CLOCKWISE, which will raise the right/back of the cabinet and lower corner of the front door. If the non-hinge corner is lower than the cabinet, go to the BACK LEFT CORNER of the cabinet and turn the leveling foot once CLOCKWISE, which will raise the left/back of the cabinet so that it is even with the corner of the front door. After adjusting the feet, open and shut the door, and check again to see if the door is aligned.
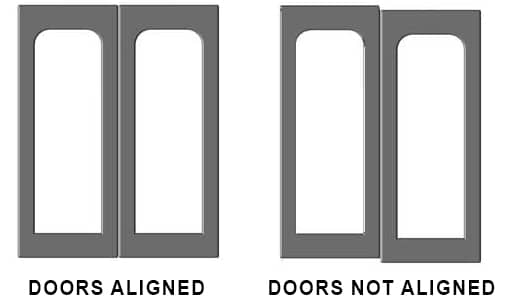
- If your wine cabinet has two doors and both doors are not on the same plane (i.e. one door is higher than the other), use the leveling feet to adjust the doors. Start with the door that is too high (in the illustration at right, the left door is too high), and go to the BACK CORNER LEVELING FOOT on the SAME SIDE as the door that's too high (in the illustration at right, go to the back foot on the left side of the cabinet.) Turn the leveling foot once CLOCKWISE, which will raise the left/back of the cabinet and lower the front left door. After adjusting the feet, open and shut the doors. Repeat the process until the left door is level with the right door. It shouldn't take more than one or two clockwise turns to get both doors aligned.
- If the top corner of a door is sticking out more than 1/8 inch, you have "top torque". If the bottom corner of a door is sticking out more than 1/8 inch, you have "bottom torque". To fix a torqued wine cabinet, raise the two center leveling feet (larger cabinets only) so that the feet aren't touching the floor. For top torque, go to the BACK CORNER LEVELING FOOT on the OPPOSITE SIDE of the torqued door and turn CLOCKWISE. For bottom torque, go to the BACK CORNER LEVELING FOOT on the SAME SIDE as the torqued door and turn CLOCKWISE. When the torque has been fixed (tolerances up to 1/8 inch are acceptable), finish by lowering the center leveling feet until they touch the floor.
Crown & Base Molding Assembly Instructions
EURO AND MISSION SERIES UPRIGHT WINE CABINETS
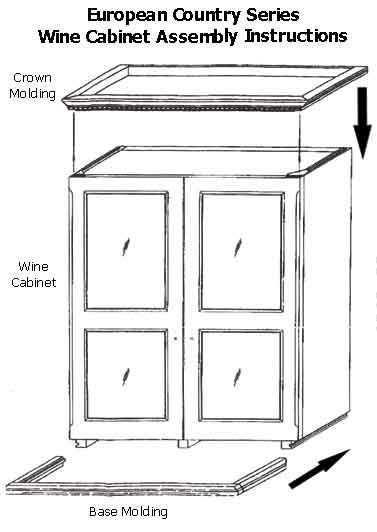
For European Country and Mission wine cabinets, the moldings are shipped in a separate box. To attach the moldings, do the following:
- Adjust the leveling feet below the wine cabinet until the doors are aligned
- Place the base molding (3-sided) on the floor in front of the wine cabinet
- Align the sides of the base molding with the tracks on the bottom of the wine cabinet, and gently slide the molding back until it comes to a stop. It may be necessary to tilt up the front of the wine cabinet in order to install the base molding. If the base molding won't slide into place, you may need to extend all the leveling feet an equal amount to raise the wine cabinet while maintaining the alignment of the doors.
- Place the crown molding on top of the wine cabinet. The hinges should seat in the slots underneath the molding.
- Some wine cabinets come with screws (included in the envelope hanging inside the wine cabinet) that can be used to attach the brackets on the crown molding to the top of the cabinet.
TOP AND BASE MOLDING ASSEMBLY INSTRUCTIONS
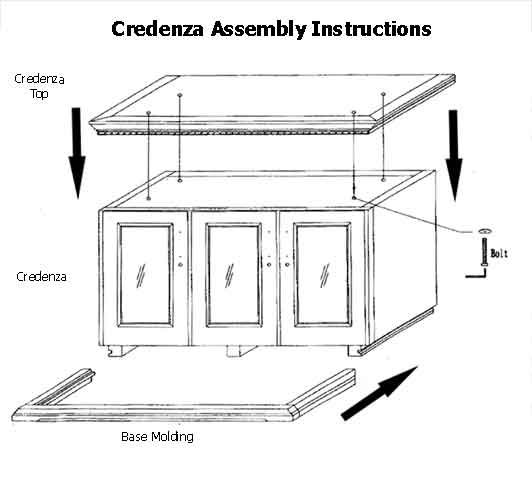
For European Country credenzas, the crown and base molding is shipped in a separate box. To attach the molding, do the following:
- Place the air scoop on the back of the cooling unit (at the back of the credenza) so that hot air is directed left (when facing the credenza)
- Adjust the leveling feet below the credenza until the doors are aligned
- Align the sides of the base molding with the tracks on the bottom of the wine cabinet, and gently slide the molding back until it comes to a stop. It may be necessary to tilt up the front of the wine cabinet in order to install the base molding. If the base molding won't slide into place, you may need to extend all the leveling feet an equal amount to raise the wine cabinet while maintaining the alignment of the doors.
- Remove the crdenza top and place it on the top of the credenza. When the credenza top is properly placed, the holes in the top will be aligned with the holes in the credenza.
- Place a washer on each bolt, and from inside the credenza, insert the bolts through the holes in the ceiling of the credenza, and use the allen key to fasten the bolts to the credenza top. DO NOT OVERTIGHTEN.